How to Tie the 5 Most Essential Fishing Knots (with Step-by-Step Diagrams)
Stop losing fish to bad knots! Master these 5 essential fishing line knots for hooks, lures, and leaders with our step-by-step diagrams. Your line, rod, and reel can be top-of-the-line. But the single weakest point in your entire setup is often your knot. A poorly tied knot means lost fish and lost lures. How do I tie fishing knots that won't fail? It's one of the most critical skills an angler can learn. This guide simplifies the process. We will teach you five essential fishing line knots that will cover 99% of your fishing needs. With these in your arsenal, you'll tie with confidence every time.

If you only learn one knot, make it the Palomar. It is widely considered one of the strongest and easiest knots to tie. Its simple design doubles the line through the hook eye. This creates incredible knot strength.
The Palomar is perfect for tying hooks, lures, and swivels to your line. It excels with nearly all line types. This includes monofilament, fluorocarbon, and especially braided lines. It is the go-to knot for many professional anglers.

Double about 6 inches of line and pass the loop through the hook eye.
Tie a simple overhand knot with the doubled line, but don't pull it tight yet.
Pass the loop over the entire hook.
Moisten the line and pull on both the main line and tag end to tighten the knot.
Trim the tag end.
When using the Palomar with slippery braided line knots, leave a slightly longer tag end. This provides an extra layer of security. Some anglers even add a dab of super glue for maximum confidence.
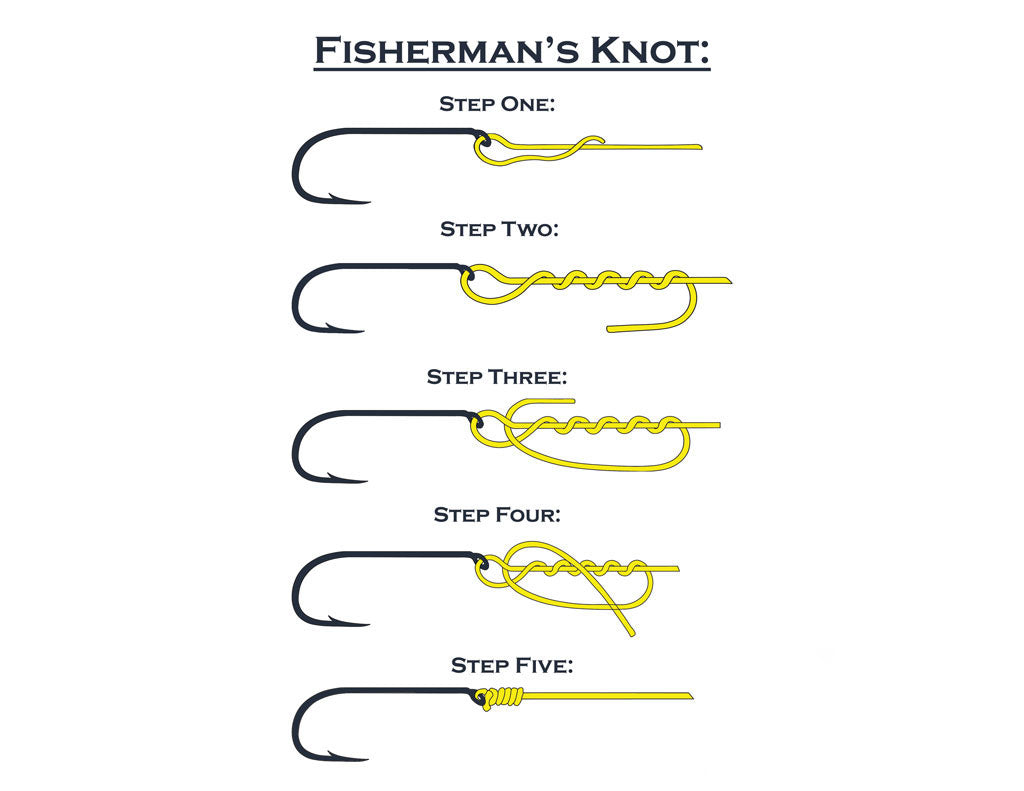
The Improved Clinch Knot is a true classic. For generations, anglers have relied on it. It is a simple and fast knot for terminal tackle connections. It is a must-know for anyone using monofilament.
This knot is ideal for monofilament and fluorocarbon lines. It's great for tying on smaller lures, hooks, and flies. While reliable, it is not the top choice for heavy braided lines. Its strength with those can be inconsistent.

Pass the line through the hook eye and wrap it around the main line 5 to 7 times.
Pass the tag end through the small loop near the hook eye.
Now, pass the tag end back through the large loop you just created.
Moisten the knot and pull the main line to tighten it down neatly.
Trim the excess.
The biggest cause of knot failure with the Improved Clinch is not wrapping enough times or pulling it tight too quickly. Take your time to ensure the coils are neat and snug.
The Uni Knot is the Swiss Army knife of fishing knots. Its versatility is incredible. You can use it for terminal connections. You can also use a variation to join two lines together.
Use the standard Uni Knot for tying line to your terminal tackle. It is strong with all types of fishing line. It can also be used for "snelling" a hook. This creates a direct line pull for better hooksets. A slightly modified version can even be used for tying line to your reel's spool.

Pass the line through the hook eye and run it parallel to the main line.
Create a loop by bringing the tag end back towards the hook.
Wrap the tag end around both lines inside the loop 5-7 times.
Moisten the knot and pull the tag end to cinch the wraps.
Slide the knot down to the hook eye by pulling the main line.
By tying a Uni Knot with each line around the other, you create a Double Uni Knot. This is an excellent and reliable leader knot for joining lines of similar diameter, such as monofilament to fluorocarbon.
Sometimes, you don't want your knot cinched tight to the lure. A loop knot creates a small, non-slip loop. This allows your lure to move more freely and naturally.
A tight knot can restrict a lure's designed action. A loop knot gives crankbaits, jerkbaits, and topwater lures more freedom to dart and wobble. This enhanced action can trigger more strikes from predatory fish. The difference in lure movement is significant.
Tie a loose overhand knot a few inches from the end of the line.
Pass the tag end through the lure's eyelet, then back through the overhand knot.
Wrap the tag end around the main line 3-5 times.
Pass the tag end back through the overhand knot again.
Moisten and pull tight, creating a secure loop.
This knot is perfect for any lure that has its own action. Think of crankbaits, jerkbaits, and topwater plugs. Avoid using it for jigs or soft plastics where a direct connection is better.
When you need to connect a braided main line to a fluorocarbon or mono leader, the FG Knot is the undisputed champion. It is incredibly strong and remarkably thin.
The FG Knot's strength comes from its unique design. It uses friction and tension, not a knot-on-knot connection. This creates a very slim profile. The knot slides effortlessly through your rod guides. This improves casting distance and reduces guide noise. It's the top choice for any braid to leader setup.
(Note: The FG Knot is complex. Clear diagrams or an embedded video are highly recommended.)
The FG Knot involves wrapping the leader around a tensioned braid line in a series of alternating hitches. It is finished with locking knots. While it takes practice, its performance is worth the effort.
Don't try to learn this knot on the water. Practice at home with some spare FTK fluorocarbon and braid. Once you master it, you'll have the strongest leader connection possible.
How do you ensure every knot is perfect? Follow these simple rules.
Use saliva or water to lubricate the line before pulling a knot tight. This reduces friction that can weaken the line. It allows the knot to seat properly for maximum knot strength.
Cut the excess tag end after tying. But leave a small amount (about 1/8 inch or 3mm). This prevents the knot from potentially slipping and coming undone under heavy strain.
Before you make your first cast, give your knot a firm, steady pull. This ensures it is seated correctly and will hold up to a fighting fish. Never trust a knot you haven't tested.
Mastering these five essential fishing knots will transform your angling experience. You will spend less time re-tying and more time fishing. You will have the confidence that your connection is strong.
Start by practicing the Palomar and Improved Clinch. Then, move on to the Uni and Loop knots. Finally, tackle the FG Knot. A reliable knot is the foundation of all good fishing tackle systems.
What is your most trusted fishing knot? Let us know in the comments!
The Palomar Knot is widely regarded as the strongest and most reliable knot for tying braided line directly to a hook or lure. For connecting braid to a leader, the FG Knot is the strongest option available due to its slim, powerful design.
Knot failure is often due to a few common reasons. The knot may have been tied incorrectly, pulled tight without lubrication (causing friction burn), or it was the wrong knot for the line type. Always moisten your knots and test them before fishing.
Yes, fluorocarbon can be stiffer and slicker than monofilament. While knots like the Improved Clinch work, the Uni Knot and Palomar Knot are often better choices for fluorocarbon. They provide excellent strength and are less prone to slipping with this line type.
Practicing at home is the best way to learn. Use a piece of thick, colored cord and a large paperclip or carabiner instead of a hook. This makes it easy to see the steps. Once you are comfortable, switch to actual fishing line to get a feel for it.